My Homemade Ant Incubator 1/26/19
In my previous post, I wrote a detailed care sheet for the species of red harvester ant known as Pogonomyrmex subdentatus. This care sheet noted that these ants do best at high temperatures, preferably 90-95F. Where I live in California, it is quite cool in the winter months, and the room temperature is usually around 65-67F. Because of this, I must keep my colonies of this species warm to ensure colony health. Many other species I keep, especially those from desert regions, also need to be warmed.
Using a variety of methods, I am able to provide suitable temperatures for all my colonies, ranging from the heat-loving ants of the Southern Californian deserts, to the hibernating ants of the Sierra Nevada mountains.
One such heating method is using my homemade incubator, which I put all of my Pogonomyrmex in, as well as a few other species.
Exterior:

As you can probably tell, from the outside it doesn't look like much. It's a torn up leather ottoman that my family has had for more years than I can remember. One of the benefits to this is that it is relatively inconspicuous because it is disguised as a piece of furniture (admittedly, a pretty torn up one).
It is quite makeshift and is in no way the best I could have done, but because I was not expecting to catch my Pogonomyrmex when I did, it was the only choice at the time.
On the inside, it consists of a 60 watt ceramic heat emitter (in a heat-resistant dome) hooked up to a temperature controlling thermometer. It has a few open spaces for free-standing formicariums (ant-homes) and a foam rack that can be added to vertically for colonies in test tubes. I made sure to put the dome on a heat resistant kitchen mat to make sure the cloth on the bottom of the ottoman does not burn due to the heat produced by the emitter.
When I was testing it out, I accidentally burnt a hole in the bottom of the cloth (seen in the second interior picture). Luckily I anticipated something going wrong during testing and I didn't keep any ants inside and was monitoring it constantly. I put the heat resistant mat below the dome for this very reason.
Interior:


To make sure there is a small gap between the removable top of the ottoman and the base, I taped pieces of gauze onto the edges... this was on a whim so I didn't have any better option. This made sure that the cables did not get caught in the lid and that adequate ventilation was provided to the ants inside. In a future incubator this is one of the things I really want to improve in.
Edges:
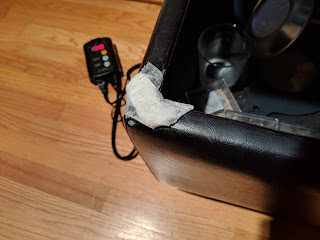
The thermometer is set to keep the temperature between 90 and 95 degrees Fahrenheit. It measures the temperature inside using a metal probe that I keep near the center of the incubator. I connected the thermometer control directly into a wall outlet and then plugged the ceramic heat emitter's power cord into the thermometer.
Thermometer probe:

Thermometer interface:

Using this heating method, my colonies grow much faster, and reduces founding time for newly caught queens. This is a huge benefit because the shorter amount of time a queen is on her own, the better. Before she gets workers, a queen ant has a very high mortality rate (usually between 1-5 out of ten queens do not make it to the colony stage, with some species being on the upper end and others on the lower). Seeing as this heating method reduces the length of the founding stage by making the brood develop faster, it also reduces the mortality rate for lots of queens. If you would like to learn more about how ants react to heat, you can read more about it here.
Thank you for reading!


Comments
Post a Comment